

David Rees thinks he knows how to sharpen pencils. He says people have entrusted 1,500 pencil points to his sharpening business. I know a little something about working with sharp pencils, and let me tell you, if you send your pencils out for sharpening you’re a fucking amateur.
I’m trained in botanical illustration with both graphite and colored pencils. If you can’t keep a needle-sharp point on your drawing tool, you won’t be able to do precision work. I can’t send my pencils out for sharpening because I need to touch up their points every few minutes.
Yes, I know his video is a joke. I’m fact checking it anyway.
The Claim: “You’re going to need a fair amount of equipment…you can buy everything you need for less than one thousand dollars.”
The Facts: He’s right. Yes, you can easily buy a pencil sharpener for less than $1000. And you will end up with a fair number of sharpeners, mechanical and electric, and none of them will be quite perfect. Rees shows us what he claims is a circa-1905 sharpener, and there’s a grain of truth to the desire for antiques. See, for graphite you can make anything work, but colored pencils are trickier, since they tend to gum up burrs and blades. If you want to get a roomful of colored pencil artists to fight, offer to sell a vintage Panasonic KP-4A to the highest bidder.
The Claim: “Number two pencils [are] the only type I sharpen…. It is our responsibility to choose a pencil that is worth sharpening.”
The Facts: Number two pencils are, in fact, a great choice. But you should choose your pencil based on how it draws when sharpened well, not on which one is the most fun to sharpen.
The artsy term for a number two pencil is an “HB” pencil. And, in fact, this was the only type I was allowed to use for my first 18 or so hours of botanical illustration classes. We spent the entire first day, I kid you not, carefully shading boxes so we could learn the full range of grays this pencil could produce, and so we could appreciate the importance of a sharp point.
Paper has a “tooth” to it, you see, and a dull pencil can’t get its graphite down into the microscopic nooks and crannies of the paper. You have to lightly grind the point over the paper, rubbing off bits of graphite to fall into those little craters and stay there, forming the drawing. This is why a sharp point is so important, and why it disappears so quickly.
The Claim: “You should take a couple hours to look through your own home and find a pencil that’s suitable for you to sharpen.”
The Facts: True. I don’t know where the hell all my pencils are. They should be in the drawer next to my art desk, in a plastic case, but sometimes they are in a pouch instead. Or the graphite ones get mixed up with the colored pencils. Or my kids will steal them. The pencil you need is always where you least expect it.
Cheap graphite pencils are almost as good as expensive ones. The problem is that they may have tiny chunks of clay or wax that you wouldn’t notice if you’re writing a grocery list, but that will drive you crazy as you try to do precision work.
A good drawing pencil is the Faber-Castell 9000, $1.75 list price, but you can probably get it cheaper with a coupon at your local art store. I know artists who splurge on Caran d’Ache pencils at $3 to $4 apiece, but do I look like I’m made of money?
The Claim: “Is it centered?…. Is it straight?…. Expose the graphite, then shape the graphite…. I am moving with such a delicate hand that I have exposed the graphite while producing minimal divots and almost no scratches.”
The Facts: If your $1.75 pencil isn’t straight with the lead more or less centered, you’ve been had. But you can sharpen it anyway, especially if you use a knife like this guy does. Just cut around the lead, wherever it might be.
Rees is right about the two steps of the process: you have to cut through the wood before you can worry about pointing the graphite. But instead of carefully carving the pencil, it’s fine to run it through whatever sharpener is on hand, or even hack at it with a kitchen knife. It really doesn’t matter how you got the pencil into its rough shape. The important part is that last millimeter.
The Claim: “We reach now for our sanding block, or our high grit sandpaper, any fine abrasive surface that we want… This is delightfully messy and wasteful…”
The Facts: Yes, people sand their pencils. Although I don’t see the point in lugging around a block in a vintage case when you can just carry an emery board if that’s the way you like to do it.
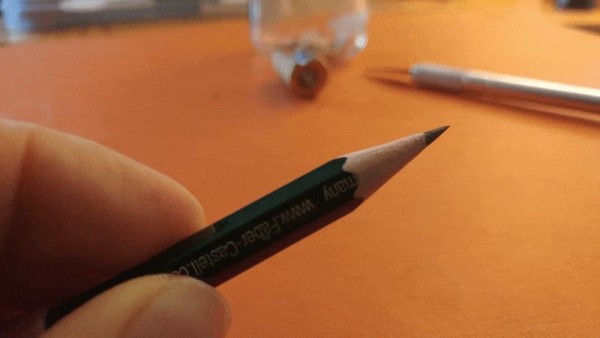
I use an x-acto knife instead. I don’t even strop it. After getting my pencil to a rough point, I use the side of the blade to scrape away any burrs or hard edges. Even my best sharpeners leave the point just a little imperfect, but with some careful scraping the pencil is ready for business.
As I’m using the pencil, if it gets a little uneven but I’m not ready to re-sharpen it, I’ll just rub the point on a scrap of rough drawing paper to get it back in shape.
The Bottom Line: His Pencils Are Okay But Mine Are Better
David Rees’s pencil sharpening methods are fine, but he takes too long and doesn’t even seem to be starting with a good quality pencil. From the mention of display tubes and labels, we can assume that these pencils never or rarely get used, making them poseurs, examples of supposed craftsmanship divorced from the joy and functionality of actual use.
On the other hand, my pencils may not be sharpened over an antique table, but I do a damn good job, I do it quickly, and I do it many times an hour. When I’m done, I have a tiny stump of a pencil and a piece of Fine Art, not a pointy sculpture that will sit sadly in a display case until artisanal pencil sharpening falls out of fashion.
Learn to sharpen your own pencils. It’s the best way.